JUST FOLLOW THESE STEPS:
Step 1: Download the sound wire app
Open play store on your android and search for sound-wire app. The results will show two versions: one paid and other on trial basis. You can download any one of them as there isn’t much difference (except an interruption of an audio saying “Sound Wire Free Version”) between the two.
Step 2: Download the server application
Once you have installed the app in your android, you need to install its server on your computer to establish the connection. You can download it from the following link- http://georgielabs.net. Depending on your pc’s operating system choose the Windows 7/8, Windows XP or Linux version as appropriate. Once downloaded, install the setup and run the server program.
Step 3: Select the Audio Source
Now, select the audio source from the “input select” dialog box. In Windows7/8, the default setting captures the audio we usually hear from the pc, while in windows xp, we need to select the audio source named as “stereo mix”, “wave out mix”, “what u hear” or a similar name for the same. You can even change the input method to microphone which will capture what you speak on the microphone attached to the pc.
Step 4: Establish a connection
Next, you need to connect both your pc and android to Wi-Fi or mobile data network . In case of mobile data networks, use 3G or 4G data network as in case of 2G networks, their will not be proper synchronization between the devices. You will also need atleast 150 kilobytes/sec consistent download speed on your phone along with an unlimited data plan for the same. You can even use the app over bluetooth teethering or USB tethering between your pc and android device by following the same procedure.
Step 5: Connect the devices
Run the sound-wire app in your mobile and once it starts, you need to click on the connect button i.e. the coiled wire image (displayed below).
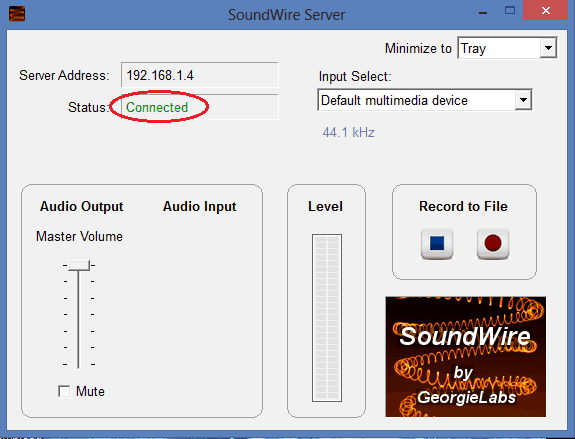
The app will auto-locate the server but in case of connection failure or multiple servers, you can even type your server address in the text edit box before connecting. Server address (Ipv4) is displayed on the upper left side of sound-wire server window in pc, for example: 192.168.23.1
Once you press the connect button, you will observe that the status of sound-wire server changes into “Connected” from “Disconnected” which is a sign that the devices are successfully connected.
Step 6: Adjusting volume levels
Now play any audio or video file on your computer and you will hear the sound coming out from your phone. When the audio is being played, check the sound-wire server level meter. This shows the volume level of sound being transmitted to your android device. You can adjust it through the audio output level and even through the volume control of the media players (such as vlc media player).
Step 7: Disconnect once used
You can use the “disconnect” button in the sound-wire app to stop the connection. If you do not have the disconnect button, you can press exit option through the menu button (or the onscreen button that looks like three vertical dots) from the app. Note that if you don’t exit the sound-wire app once you are finished using it, the app will keep on running endlessly reducing the battery level.
Step 8: Settings to improve connection
You can even do some settings by pressing the menu (three vertical dots) button→ settings from the sound-wire app. Some of the settings necessary to use the app are:-
- Connect on Start- The app will connect to the defined server as soon as the app starts saving your time to connect it once you press the coiled image.
- Auto reconnect- Keeps on trying to reconnect continuously if the server connection is lost providing a fair and smooth audio transfer. This is very helpful if you have a poor Wi-Fi connection.
- Audio Compression- By enabling audio compression you can reduce the network usage by the app and can even reduce the chances of more dropouts.
Many users including me faced the problem of audio delay while using the app. Whereas, I have come to a solution of this problem that will enable the devices to be in sync, no matter how poor your internet connection is.
Open the vlc media player and click on tools→ preferences. Then, from the dialog box select hotkeys tab and find the audio delay down action among the list of actions. Once found, double click on the corresponding tab below hotkey’s list.
Change the hotkey to ‘k’ or any other alphabet and click on save. Play a video through the app and press “k” (or the designated key). This will play audio a few seconds before the video in the player and sound wire will catch it before. You can press the key again until the sound is synchronized. For me, it worked at -200ms.


